

Java still is one of the most popular programming languages, and a lot of people want to get into java programming. However, if you are new to (Java) programming, you might not know how to get the JDK (Java Development Kit) to be able to compile your code. Therefore, I’ll show you how to install the free JDK in the following article.
Table of contents:
Before we get started
Some systems have already got the JDK installed, and there’s no need to install it again if the version is relatively up to date.
To check if you’ve already got the JDK, you can open your terminal and enter the following command:
javac -version
If the command doesn’t return an error but something like “javac <some version>“, the Java JDK is already installed!
How to Install the Java JDK on Windows
Step #1: Download the latest Java JDK installer from the official download page.
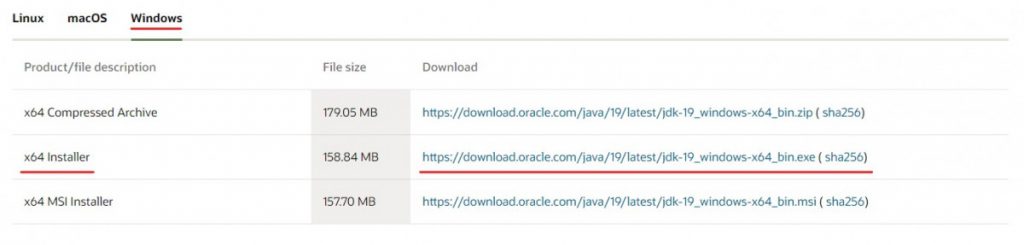
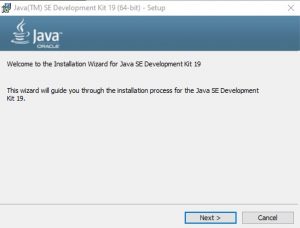
Step #2: Open the downloaded .exe file and follow the instructions of the installer.
Add Java to the path
To be able to execute java commands from any directory, you’ll need to add Java to the system Path.
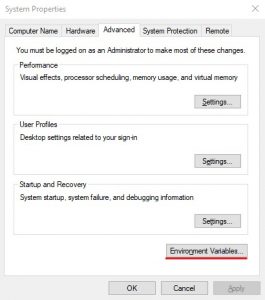
Step #1: Search for ‘environment‘ in the search to open the environment variable settings
Step #2: Click on ‘Environment Variables …‘
Step #3: Edit the ‘Path‘ entry under ‘System variables‘
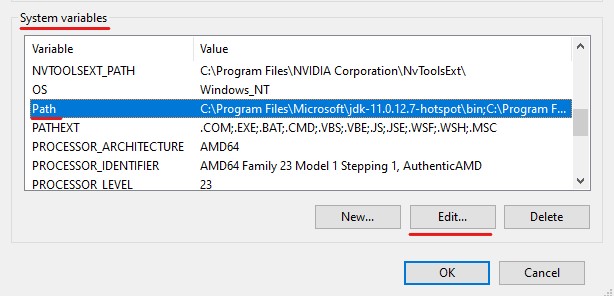
Step #4: Add a new Entry with your JDK path
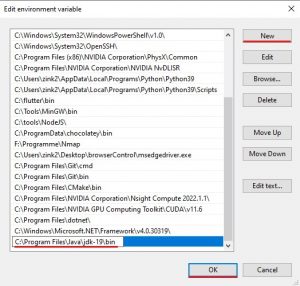
If you didn’t specify a different path at the installation, the default path is:
C:\Program Files\Java\jdk-19\bin
Step #5: Close all windows by pressing ‘OK‘
Lastly, check your installation by running the following command in a new terminal window
(Win + X > Windows PowerShell)
javac -version
How to install the JDK on Linux (Debian/Ubuntu)
Before we start, make sure to update your packages:
sudo apt-get update && apt-get upgrade -y
Install OpenJDK (easier way)
Step #1: Install the JRE (Java Runtime Environment)
sudo apt-get install openjdk-17-jre
Step #2: Install the JDK (Java Development Kit)
sudo apt-get install openjdk-17-jdk
. . . or for servers without a monitor:
sudo apt-get install openjdk-17-jdk-headless
Of course, you can change the version of JRE and JDK by changing the number 17 to a different version. However, keep in mind that both versions have to match.
That’s it!
However, if those commands didn’t work for you, run the following one to see which OpenJDK versions you can install without having to manually download something.
apt-cache search openjdk
Install the official Oracle JDK
Oracle also provides simple deb and rpm installers for a quick and clean installation:
				// for Linux distributions using DEB packages:
sudo dpkg -i jdk-18_linux-x64_bin.deb

// for Linux distributions using RPM packages
sudo rpm -ivh jdk-18_linx-x64_bin.rpm
Also, you have the option to manually install Java. With this option, you’ll be able to better control what happens to the installation and your system.
Step #1: Create a folder for the installation
sudo mkdir /usr/lib/jvm && cd /usr/lib/jvm
Step #2: Download the JDK from Oracle
sudo wget --no-check-certificate -c --header "Cookie: oraclelicense=accept-securebackup-cookie" https://download.oracle.com/java/19/latest/jdk-19_linux-x64_bin.tar.gz
Step #3: Extract the downloaded file
sudo tar -xvzf jdk-19_linux-x64_bin.tar.gz
Make sure, the jdk-19 folder is included, by running the ls command.
Step #4: Edit the environment variables
sudo nano /etc/environment
If you don’t want to use nano, you can use any other text editor too.
Now, add the following folder to the existing PATH variable separated by a colon (:)
/usr/lib/jvm/jdk-19/bin
Additionally, create the following environment variable:
JAVA_HOME="/usr/lib/jvm/jdk-19"
The modified environment file should look something like this:
				PATH="/usr/local/sbin:/usr/local/bin:/usr/sbin:/usr/bin:/sbin:/bin:/usr/lib/jvm/jdk-19/bin"
JAVA_HOME="/usr/lib/jvm/jdk-19"
Now, save the changes and exit from nano (Ctrl + S, Ctrl + X)
Step #5: Specify Java’s location
				sudo update-alternatives --install "/usr/bin/java" "java" "/usr/lib/jvm/jdk-19/bin/java" 0

sudo update-alternatives --install "/usr/bin/javac" "javac" "/usr/lib/jvm/jdk-19/bin/javac" 0

sudo update-alternatives --set java /usr/lib/jvm/jdk-19/bin/java

sudo update-alternatives --set javac /usr/lib/jvm/jdk-19/bin/javac
To check the setup, run the following commands:
				update-alternatives --list java

update-alternatives --list javac
If everything is correct, these two commands should return the correct location of Java.
Step #6: Restart your computer
Step #7: Start coding!
Keep in mind that the paths you have to use may vary depending on the version you want to use.
Thanks for reading, and happy coding!
Thank you