

Coding projects are the top way to improve your coding skills or make money from coding. Because those projects are that important, you definitely need to structure them before actually implementing them. Otherwise, a lot of your projects are going to fail because you won’t know what to do anymore at some point.
However, planning a coding project can be very difficult as there are a lot of things you have to consider. Therefore, this article will walk you through how to plan your next coding project.
Here's a quick overview of the steps of planning a coding project:
Step #1: Come up with a project idea
Of course, you need a project to start planning it. If you don’t have any ideas yet, you can search for some project ideas on Google or YouTube, look through social media, or have a look at the blog post I wrote about 15 coding project ideas for beginners.
A different method to come up with a project idea is to think of problems you encounter in everyday life. Every project is just a solution to a problem, and maybe you’ll find a problem that you can solve with code.
In general, I suggest not choosing any project that is too easy for you if you want to learn something from it. Even as a beginner, it is very important that you keep learning by having to research some problems and topics you didn’t know about.
Of course, the project should be fun. Otherwise, you will most likely lose interest in it very soon!
Step #2: Search for similar projects
The next step is to search for similar projects on Google, YouTube, and GitHub. This step should give you some inspiration and ideas for features that other projects may be missing.
Additionally, you may find some code implementations of various problems, which you can use yourself. However, do not forget to note the project somewhere to give credits in your code if you directly copy a code snippet.
I suggest writing down all your thoughts and ideas so that you do not forget about them. Later on, you can also use this list to write down some implementation ideas for all your ideas. If you don’t have any app for writing notes yet, I highly recommend Notion.
Maybe you can even get in touch with some developers of the projects to ask them about problems they encountered and how they solved them.

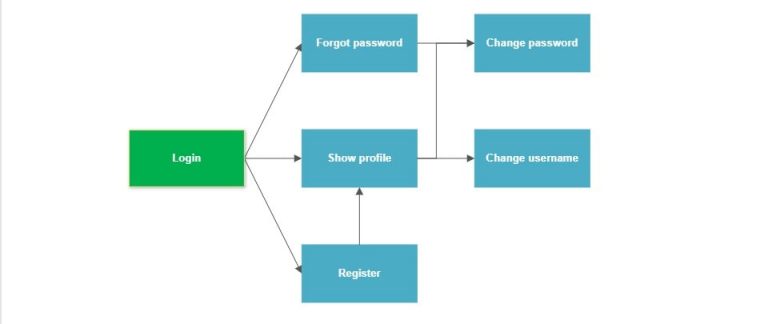
Step #3: Make a list of every feature & create a flowchart
After you’ve collected enough ideas, it’s time to think about which of your ideas are actually going to be implemented in the project. Make sure that you care about the key features at first and then decide which additional features you’d like to implement.
In addition, this is a good time to directly connect the features in a basic flowchart to determine how your program should work when it’s done. However, you don’t have to add every single function, especially if your project is very big, but it should include at least all key functionalities. You can use tools like smartdraw to create a flowchart for free.
If you want, you can already include some pseudocode to optimize the actual coding process. Pseudocode means that you include function names, simplified loops and if statements with a short explanation.
(e. g. resetPassword() -> send an email with a reset link providing a reset form)
Step #4: Decide on a platform
Next, you need to choose the platform you want to code for. – Should it be for Mobile? Web? Or Desktop?
Simply ask yourself: “Who’s my project for?“, “What are the use cases?“, “What are advantages and disadvantages of each platform?“
Of course, you can create a version of your project for multiple platforms. However, keep in mind that developing for more than one platform usually requires a lot more effort.
Step #5: Choose your language
Now you have to decide on the language you want to use to implement the project.
I suggest using a language that fits your project type and platform. If you are undecided on language, here are some of the most common languages in each category:
- Web Apps: JavaScript, Ruby, Python, HTML/CSS, TypeScript
- Mobile Apps: Swift, Objective-C, Java, Kotlin, Dart with Flutter
- Console/Back-End Applications: Java, C#, C++, C, Python, Rust
- Machine Learning & Data Science: Python, R, Julia
- Big Data: Java, Python, R, Scala
- Data Storage: SQL, Java, Python
Step #6: Find and list services and APIs
The sixth step of this list is about finding and listing services and APIs. Depending on your use case, you may appreciate the data you need fetched and delivered by an API.
An example use case could be a weather app where you need a lot of data. Therefore, you could use an API like the one from OpenWeatherMap.
To find such APIs and services, you can simply search for the ones you need on Google. Another method of finding APIs is to have a look at the RapidAPI Hub. There you can find tons of different APIs for almost every use case.
Of course, make sure you write down your findings as well as some links!
Step #7: Create a mockup
A mockup is a non-functional version of your project to plan things like the UX or UI. For example, if you want to create a social media app, you could create a graphical version of that app. However, the app is not working yet, and it just represents the looks.
Even if your application is just a console application without any graphics, you can still create some kind of mockup that prints out different things and acts like it’s doing something, whereas it is just a prototype that doesn’t do anything.
To create a mockup for graphical web-, android- and desktop applications, you can use a free service like Renderforest’s mockup creator.
Step #8: Schedule the project
The final step is to schedule every step you have to take to complete your project. Scheduling helps you to actually keep working on the project and gives you an overview of everything that is important.
Additionally, a schedule ensures that you don’t change your project too much on the go, as this behavior would lead to you losing track of everything, hence, losing motivation.
I suggest you take a calendar and set deadlines for each step you have to take to get closer to a finished project. Again, I highly recommend the awesome tool Notion for creating your schedule.
This step of planning a coding project is one of the most important ones. Especially if your project is pretty big, it is most likely going to fail if you simply skip this step!

Conclusion
Coding projects are a great (or even the best) way to earn money or just improve your coding skills.
However, planning a coding project is absolutely necessary to ensure it doesn’t fail because of factors like your motivation. Therefore, you should bookmark this site so you can always have a look at how to plan your next project.
If you finish your project, you can also publish it on platforms like GitHub to help others who want to start a new project similar to yours.
Thanks for reading!