
The ESP32 microcontroller comes with built-in capacitive touch sensors, making it easy to create touch-based interfaces without additional hardware. Whether you want to build touch-sensitive buttons, sliders, or wake-up functions, the ESP32’s capacitive touch feature provides a simple solution.
In this guide, you’ll learn how to use the ESP32 capacitive touch sensor with the Arduino IDE, including wiring, coding, and practical applications.
How Do the ESP32 Capacitive Touch Sensors Work?
Capacitive touch sensors work by detecting changes in capacitance when a conductive object, such as a human finger, touches the sensor.
The ESP32 has multiple touch-sensitive GPIO pins that can be used to measure these changes. When you touch a pin, the capacitance increases, and the ESP32 detects the change, triggering an event in the code.
ESP32 Capacitive Touch Sensor Pins
Check out the following pinout for the ESP32 DevKit v1. The touch pins are highlighted in pink.
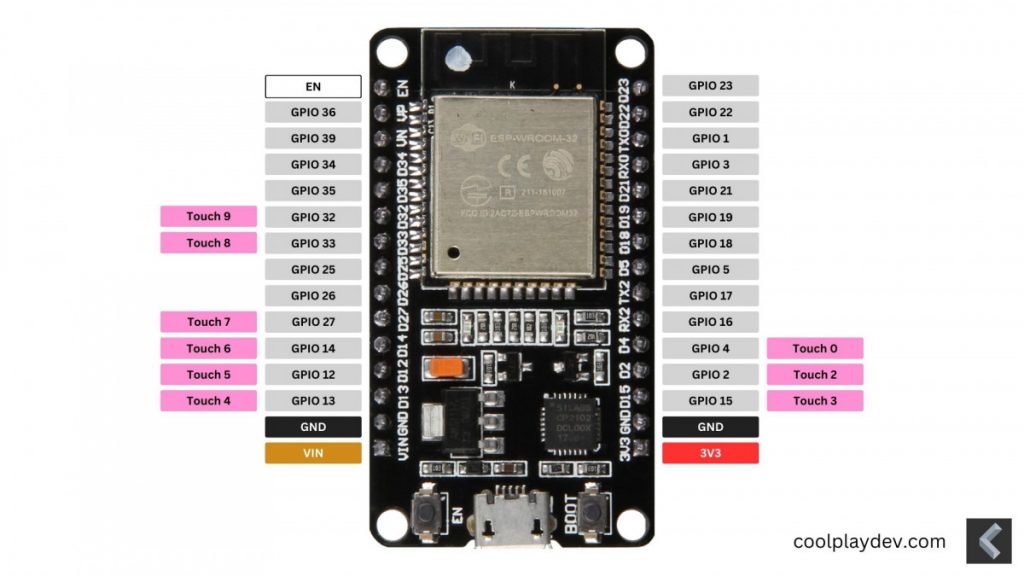
Here’s a table to look up which GPIO pin corresponds to which Touch Pin:
| Touch Pin | GPIO Pin |
| T0 | GPIO 4 |
| T1 | GPIO 0 |
| T2 | GPIO 2 |
| T3 | GPIO 15 |
| T4 | GPIO 13 |
| T5 | GPIO 12 |
| T6 | GPIO 14 |
| T7 | GPIO 27 |
| T8 | GPIO 33 |
| T9 | GPIO 32 |
Wiring the ESP32’s Touch Pins
The ESP32’s touch pins do not require additional wiring since they are built into the GPIO pins. However, I suggest connecting a jumper cable to the pin for easier access.
Additionally, you can connect a conductive piece, like aluminum foil, to increase the touch-sensitive surface.

Programming the ESP32 Touch Sensor in Arduino IDE
To use the ESP32’s capacitive touch functionality, you can use the touchRead() function in the Arduino IDE.
In case you haven’t set up the Arduino IDE to work with ESP32 microcontrollers, follow along with this tutorial.
Read the Touch Sensor Value
void setup() {
  Serial.begin(115200);
}

void loop() {
  int touchValue = touchRead(T0); // GPIO 4
  Serial.println(touchValue);
  delay(250);
}
When running the code, open the Serial Monitor (115200 baud rate) to see the sensor readings. A lower value indicates a touch event, while a higher value means no touch.
Detect Touch With a Threshold Value
To detect a touch in your application, set a threshold value. For instance, if the sensor gives a value of 100 when not touched, and something about 20 when touched, set a threshold of about 30.
const int threshold = 30;

void setup() {
  Serial.begin(115200);
}

void loop() {
  if (touchRead(T0) < threshold) { // GPIO 4
    Serial.println("Touch detected!");
  }
  delay(250);
}
Again, watch the Serial Monitor with a baud rate of 115200 for the results.
Using ESP32 Capacitive Touch for Wake-Up
One useful feature of the ESP32 touch sensor is that it can be used to wake the device from deep sleep mode. Here’s an example:
#define WAKE_PIN T0 // GPIO 4

void callback() {
  Serial.println("Woken up by touch!");
}

void setup() {
  Serial.begin(115200);
  delay(1000);
  touchAttachInterrupt(WAKE_PIN, callback, 40); // pin, callback, threshold
  esp_sleep_enable_touchpad_wakeup();
  Serial.println("Going to sleep . . .");
  esp_deep_sleep_start();
}

void loop() {}
In setup(), we use the touchAttachInterrupt() function to trigger an interrupt when the touch sensor value is below a certain threshold. Also, we define a callback() function that runs when the interrupt gets triggered.
Then, we use esp_sleep_enable_touchpad_wakeup() to wake the esp from deep sleep mode, when touching the touch pin.
Last but not least, we start the ESP32 deep sleep mode with esp_deep_sleep_start().
Applications of ESP32 Capacitive Touch
Here’s a short list of popular applications where the capacitive touch pins of the ESP32 are used:
- Touch-sensitive buttons for user interfaces
- Gesture recognition for interactive projects
- Wake-up functionality to save power in battery-powered devices
- Security applications such as hidden touchpads
Wrapping Up
The ESP32’s built-in capacitive touch sensors make it easy to add touch functionality to your projects without additional hardware.
Using the touchRead() function in the Arduino IDE, you can implement touch-based controls, wake-up features, and more.
Also, check out how to power the ESP32 correctly without damaging your board.
What would you use the ESP32’s capacitive touch pins for? Share your ideas in the comments!
Thanks for reading, Happy Coding!
Links marked with an asterisk (*) are affiliate links which means we may receive a commission for purchases made through these links at no extra cost to you. Read more on our Affiliate Disclosure Page.